

Sunday, May 1, 2011
My Digital Studio - Heather Summers MDS Club
This is another of the pages I created with a template provided by Heather. Again, I have used a punch in place of the photo.


Wednesday, April 27, 2011
My Digital Studio - Heather Summers' Simply MDS Online Club
I haven't been doing any stamping since returning from vacation but I have been "playing" with My Digital Studio. I have been creating some pages following the templates Heather is providing to her Simply MDS Club members so I will be posting those over the next few weeks.
This page was created with photos of Judy's grandson. I have removed the actual photos and replaced them with punches.

This page was created with photos of Judy's grandson. I have removed the actual photos and replaced them with punches.

Sunday, April 24, 2011

Saturday, April 23, 2011
Heather Summers' Simply MDS Online Club
Another page using a format supplied by Heather for her club members.

Wednesday, April 13, 2011
My Digital Studio
This is the second page I created following a template Heather Summers shared in her Simply MDS Online club. The photos were taken the day Judy, Wayne and I went to Bald Head Island, North Carolina. We had to take a ferry across to the island and rented a golf cart to tour around the island.
It was a great day!

It was a great day!

Sunday, April 10, 2011
My Digital Studio
In January Heather Summers started a Simply MDS Online Club that I siged up for. Although I have not created very much using the weekly templates Heather provides I have been enjoying following her posts and the photos of projects the participants have shared.
I have now completed two MDS pages following Heather's templates - both with photos from Myrtle Beach.
This one uses a photo as the background paper and then there are three photo boxes and a couple of text boxes added in.

I have now completed two MDS pages following Heather's templates - both with photos from Myrtle Beach.
This one uses a photo as the background paper and then there are three photo boxes and a couple of text boxes added in.

Wednesday, April 6, 2011
Birthday Cards
While we were in Myrtle Beach both Judy and her husband Wayne celebrated birthdays. I made cards for them before leaving home but didn't post the photos to my blog. Now that we are home, I am trying to catch up and start posting more often to my blog.


Wednesday, March 30, 2011
Jewelry Making
Yesterday Judy and I went to jewelry making class here in Myrtle Beach. It was at a place called Beach Beads - owned by Heather and Chad Samson. We had signed up for the basic class. Our instructor - Heather Samson - reviewed with us some of the basics before we started making our bracelets.
For the focal point on my bracelet I chose a set of 3 glass beads hand made by Heather. They are Lampwork beads. You can link to the Beach Beads website HERE. With Heather's help I selected other beads to complement the Lampwork beads and set to work. I was fortunate that my design came together quickly and I was able to complete my bracelet during the class.
Here is my finished bracelet. The photo is not the best - I had it sitting on a table with a glass top - but you get the idea.

I wish I had thought to make coordinating earrings - I have contacted Heather to see if she could make me a pair and ship them to me.
We had a lot of fun and have decided that we'll be making more bracelets and perhaps a necklace or two. Not sure about earrings.
For the focal point on my bracelet I chose a set of 3 glass beads hand made by Heather. They are Lampwork beads. You can link to the Beach Beads website HERE. With Heather's help I selected other beads to complement the Lampwork beads and set to work. I was fortunate that my design came together quickly and I was able to complete my bracelet during the class.
Here is my finished bracelet. The photo is not the best - I had it sitting on a table with a glass top - but you get the idea.

I wish I had thought to make coordinating earrings - I have contacted Heather to see if she could make me a pair and ship them to me.
We had a lot of fun and have decided that we'll be making more bracelets and perhaps a necklace or two. Not sure about earrings.
Sunday, March 27, 2011
Wednesday, March 23, 2011
Vioeo - Summer BBQ Card
Alhough the actual stamp featured in this video is no longer available, the image is a My Digital Studio download.
King of the Grill - Summer BBQ Card - Stampin Up from Tami White on Vimeo.
King of the Grill - Summer BBQ Card - Stampin Up from Tami White on Vimeo.
Sunday, March 20, 2011
Wednesday, March 16, 2011
Sunday, March 13, 2011
Wednesday, March 9, 2011
Sunday, March 6, 2011
Video - Awash With Flowers
Although I haven't used it in a while, Awash With Flowers is one of my favourite stamp sets.
Awash with Flowers 2-Step Stamping from Tami White on Vimeo.
Awash with Flowers 2-Step Stamping from Tami White on Vimeo.
Wednesday, March 2, 2011
Sunday, February 27, 2011
Friday, February 25, 2011
Wednesday, February 23, 2011
Video - Motorcycle Card
Altough the Motorcycle Stamp was only available in last year's summer mini catalogue the image was recently released as a download for My Digital Studio.
Born to be Wild - Motorcycle Card from Tami White on Vimeo.
Born to be Wild - Motorcycle Card from Tami White on Vimeo.
Sunday, February 20, 2011
Friday, February 18, 2011
Wednesday, February 16, 2011
Sunday, February 13, 2011
Friday, February 11, 2011
Altered Pocket Calendar
On Wednesday Judy and I had a crafting day - our first since arriving in Myrtle Beach. We did a little bit of work in My Digital Studio and then moved on to paper crafting. I had picked up a couple of pocket calendars at the dollar store back home and brought along everything we would need to alter them.
We covered the calendar with Rose Red card stock. We took a piece of Olive Green card stock and added a piece of Sweet Pea DSP (retired) along with a piece of Whisper White that had been scalloped along the bottom edge. Once that was assembled we wrapped a piece of Olive Green satin ribbon around the panel and adhered it to the front of the calendar. After that we added our Stitched Felt (retired) pieces and the little embellishment at the top.
Once completed we carefully inserted it back into the plastic cover and we were ready to go.

We covered the calendar with Rose Red card stock. We took a piece of Olive Green card stock and added a piece of Sweet Pea DSP (retired) along with a piece of Whisper White that had been scalloped along the bottom edge. Once that was assembled we wrapped a piece of Olive Green satin ribbon around the panel and adhered it to the front of the calendar. After that we added our Stitched Felt (retired) pieces and the little embellishment at the top.
Once completed we carefully inserted it back into the plastic cover and we were ready to go.

Wednesday, February 9, 2011
Sunday, February 6, 2011
Thursday, February 3, 2011
Sunday, January 30, 2011
Wednesday, January 26, 2011
Video - Paper Flower Rosettes
Some of the Stampin' Up! products used in this video are now retired.
Paper Flower Rosettes - Stampin Up from Tami White on Vimeo.
Paper Flower Rosettes - Stampin Up from Tami White on Vimeo.
Saturday, January 22, 2011
Stampin' Up! Video - Letterpress Plates
A week to go until I leave for vacation. While I am away I'll be posting once or twice a week but probably not my own work. As I said in a previous post I stumbled on a wonderful blog featuring videos of various stamping techniques and will be featuring my favourites over the next couple of months.
Today's video is from Stampin' Up! and shows how to use the Letterpress Plates that they introduced into their product line in the now retired Mini Holiday Catalogue - good news is the plates will carry over so are still available.
Today's video is from Stampin' Up! and shows how to use the Letterpress Plates that they introduced into their product line in the now retired Mini Holiday Catalogue - good news is the plates will carry over so are still available.
Thursday, January 20, 2011
Tuesday, January 18, 2011
My Digital Studio - Journal
In early December I created a journal in My Digital Studio to give to my niece who is getting married in July. I thought it would be great for her to have a personalized journal to jot down her thoughts; keep track of wedding plans; record shower and wedding gifts; use as a guest book, etc. It was my first journal and the only item (except the card I created and had printed in order to be certified in My Digital Studio) I submitted for professional printing. I was so nervous from the minute I completed the order to the time when UPS delivered it to my door. I could hardly wait to rip open the package. I was thrilled with it!
I wanted to wait until the day we were getting together to make her wedding invitations to give it to her so I couldn't post the photo. Sunday was the day. Judging by her emotional reaction, I am pretty sure she was as thrilled with it as I was.

I wanted to wait until the day we were getting together to make her wedding invitations to give it to her so I couldn't post the photo. Sunday was the day. Judging by her emotional reaction, I am pretty sure she was as thrilled with it as I was.

Sunday, January 16, 2011
Video - Stamping on Vellum Card Stock
I recently stumbled onto a wonderful blog (http://stampwithtami.com/tv/) with a lot of videos featuring many great stamping techniques and ideas. I received Tami's permission to feature her videos on my blog for the next few months as I will be away from my stamping room. Although I will have stamping supplies with me, they will be limited.
This first video demonstrates the Stained Glass Vellum Technique. Very pretty. I hope you enjoy and are inspired by this technique.
Stained Glass Vellum Technique - Stampin Up from Tami White on Vimeo.
This first video demonstrates the Stained Glass Vellum Technique. Very pretty. I hope you enjoy and are inspired by this technique.
Stained Glass Vellum Technique - Stampin Up from Tami White on Vimeo.
Friday, January 14, 2011
More My Digital Studio Downloads
Here are the rest of the MDS downloads released this week:
124020 Seam Binding II Ribbon Pack $4.95

124488 Extra Postage Stamp Brush Set $4.95

124491 Motorcycle Stamp Brush $2.50

124492 Printed Petals Stamp Brush Set $4.95

125157 Chat Room Good Thoughts Stamp Brush Set $7.95

124541 Chat Room Celebrate Stamp Brush Set $7.95
If you have not done so already.. I encourage you to join www.MyDigitalStudio.net .. it's an amazing site with hundreds of samples, videos, tutorials, tips and Q&A Forums for both demonstrators and customers.
Have a great day!
124020 Seam Binding II Ribbon Pack $4.95
124488 Extra Postage Stamp Brush Set $4.95
124491 Motorcycle Stamp Brush $2.50
124492 Printed Petals Stamp Brush Set $4.95
125157 Chat Room Good Thoughts Stamp Brush Set $7.95
124541 Chat Room Celebrate Stamp Brush Set $7.95
If you have not done so already.. I encourage you to join www.MyDigitalStudio.net .. it's an amazing site with hundreds of samples, videos, tutorials, tips and Q&A Forums for both demonstrators and customers.
Have a great day!
Thursday, January 13, 2011
Botanical Landscape DSP
One day while scrolling through the gallery on Stampin' Connection I saw a card I liked using the Two Step Bird punch and the Botanical Landscape DSP available in the new Occasions Mini catalogue. You can see the original card HERE. I bookmarked it thinking it would be a great project for Judy and I. I had decided that I was not going to purchase the package of DSP but I did buy the download for My Digital Studio so I printed a few pages and put together everything we needed to make our cards this week.
I think the original card was a 4 x 4 but I decided ours would be 5 1/2" x 4 1/4". For my sample card (below) I used the get well sentiment from Teeny Tiny Wishes but for now we have left off the sentiment and will add it when an occasion arises.

Supplies
Stamp - Teeny Tiny Wishes
Ink - Rich Razzleberry, Chocolate Chip, Always Artichoke and Early Espresso Markers
Card Stock - Naturals White, Rich Razzleberry
Other - My Digital Studio, Botanical Landscape digital download, Basic Pearls, Two Step Bird Punch, Word Window punch, Modern Label Punch, Chantilly Crochet Trim, Stampin' Dimensionals
I think the original card was a 4 x 4 but I decided ours would be 5 1/2" x 4 1/4". For my sample card (below) I used the get well sentiment from Teeny Tiny Wishes but for now we have left off the sentiment and will add it when an occasion arises.

Supplies
Stamp - Teeny Tiny Wishes
Ink - Rich Razzleberry, Chocolate Chip, Always Artichoke and Early Espresso Markers
Card Stock - Naturals White, Rich Razzleberry
Other - My Digital Studio, Botanical Landscape digital download, Basic Pearls, Two Step Bird Punch, Word Window punch, Modern Label Punch, Chantilly Crochet Trim, Stampin' Dimensionals
Wednesday, January 12, 2011
Yesterday Stampin'Up! released 14 more downloads for My Digital Studio. Here are a few of them. I will post the rest on Friday.
124034 Pink Pirouette Patterns Designer Series Paper $2.50

124032 Rose Red Patterns Designer Series Paper $2.50

124037 Wild Wasabi Patterns Designer Series Paper $2.50

124035 So Saffron Patterns Designer Series Paper $2.50

124024 Letterpress Alphabet Stamp Brush $2.50

124025 Lots of Love Stamp Brush $2.50

124026 Valentine Defined Stamp Brush Set $7.95

124029 Be My Valentine Stamp Brush $2.50

124034 Pink Pirouette Patterns Designer Series Paper $2.50
124032 Rose Red Patterns Designer Series Paper $2.50
124037 Wild Wasabi Patterns Designer Series Paper $2.50
124035 So Saffron Patterns Designer Series Paper $2.50
124024 Letterpress Alphabet Stamp Brush $2.50
124025 Lots of Love Stamp Brush $2.50
124026 Valentine Defined Stamp Brush Set $7.95
124029 Be My Valentine Stamp Brush $2.50
Tuesday, January 11, 2011
Coaster Calendar
In early December Angie Juda posted a video showing how to create a cute little desktop calendar using chipboard coasters. You can see it HERE. Angie used rectangular coasters which I knew I didn't have and didn't really know where I could find them. Angie does offers then for sale but she doesn't ship them to Canada. I was pretty sure I had some 4" x 4" coasters so I printed out the calendar from the tempate Angie has for sale HERE and cut it to size following her directions.
When I went looking for my coasters I couldn't find them. I looked everywhere (or so I thought). I put my calendar pages to one side and ordered some coasters. Well wouldn't you know it - I was looking for something else and found the darned coasters. I was happy that I was now able to proceed with my calendar but very unhappy with myself for not seeing them before! It was too late to cancel the order - it was on it's way - so don't be surprised if you see a lot of coaster projects over the coming months.

Supplies
Card Stock - Early Espresso, Greenhouse Gala DSP
Other - 4 x 4 Chipboard Coasters, Crop a Dile, Jumbo Eyelets (Antique Brass), Brads (Antique Brass), Pear Pizzazz 1/2" Stitched-Poly ribbon
Sunday, January 9, 2011
More Cupcake Cards
A couple of days ago I posted a card Judy and I had made using the coordinating cupcake stamp set and punch. The same day we made that card we also made a few cards using the same layout but with a more "girly" colour palette.


Supplies
Stamp Set - Create a Cupcake
Ink - Chocolate Chip, Pink Pirouette, Regal Rose
Card Stock - Chocolate Chip, Pink Pirouette, Pumpkin Pie, Regal Rose, Real Red, Whisper White, Sweet Always DSP (retired)
Other - Build a Cupcake punch,Small Heart Punch, Basic Rhinestones, Stampin' Dimensionals, Embroidery Floss (nonSU), Chocolate Chip 5/8" Satin Ribbon (retired)


Supplies
Stamp Set - Create a Cupcake
Ink - Chocolate Chip, Pink Pirouette, Regal Rose
Card Stock - Chocolate Chip, Pink Pirouette, Pumpkin Pie, Regal Rose, Real Red, Whisper White, Sweet Always DSP (retired)
Other - Build a Cupcake punch,Small Heart Punch, Basic Rhinestones, Stampin' Dimensionals, Embroidery Floss (nonSU), Chocolate Chip 5/8" Satin Ribbon (retired)
Friday, January 7, 2011
Build a Cupcake
This week when I went over to Judy's I finally pulled out the Build a Cupcake punch and the coordinating Create a Cupcake stamp set. I had bought them at the beginning of December when demonstrators were able to pre-order from the Occasions Mini Catalogue.
I had seen THIS card and although I don't have the DSP used I did have some retired paper with a similar colour palette.

Supplies
Stamp Set - Create a Cupcake
Ink - Always Artichoke, Baja Breeze, Crumb Cake, Early Espresso
Card Stock - Always Artichoke, Baja Breeze, Crumb Cake, Very Vanilla, Manchester DSP (retired)
Other - Build a Cupcake punch, Hemp Twine - natural, Stampin' Dimensionals
I had seen THIS card and although I don't have the DSP used I did have some retired paper with a similar colour palette.

Supplies
Stamp Set - Create a Cupcake
Ink - Always Artichoke, Baja Breeze, Crumb Cake, Early Espresso
Card Stock - Always Artichoke, Baja Breeze, Crumb Cake, Very Vanilla, Manchester DSP (retired)
Other - Build a Cupcake punch, Hemp Twine - natural, Stampin' Dimensionals
Wednesday, January 5, 2011
Recycling
In addition to the box I made to hold the Decor Blocks I had decorated I also "made" a gift bag. I had some white bags with a company logo on them so I decided to do a wintery scene on one. I tore some DSP from the Candy Cane Christmas pack and glued it over the logo. I then added some trees cut out with a Sizzix die (nonSU) and added some stickles.
I filled a couple of glass ornaments with strips of rolled up DSP and attached them to the handles with ribbon. There was still a lot of white space so I used a self adhesive die cut from the Christmas Cheer Simply Scrappin' kit.

I filled a couple of glass ornaments with strips of rolled up DSP and attached them to the handles with ribbon. There was still a lot of white space so I used a self adhesive die cut from the Christmas Cheer Simply Scrappin' kit.

Monday, January 3, 2011
Another Set of Decor Blocks
A couple of weeks ago I showed you a set of Decor Blocks that I had decorated. The plan when I started them was to use them as the gift for a Chinese Auction I was participating in. I liked them so much I kept them for myself and then had to figure out what to do for the gift. The solution was another set of blocks! I had bought four sets last year along with four sets of the Holiday Mix Decor Elements. I covered the blocks exactly as I had before but the Holiday Mix Decor Elements I had to choose from were black, white and red. I knew that the black would be the ones to use so applied them to the decorated blocks. After I had made the first set of blocks I went back and added some Basic Pearls. It really added to the finished blocks so I did the same on this second set.
I then had to figure out how to wrap the blocks for gift giving. I made a custom box for them.

I really need to get my light box out again but it is still packed away.
I then had to figure out how to wrap the blocks for gift giving. I made a custom box for them.

I really need to get my light box out again but it is still packed away.
Saturday, January 1, 2011
Friday, December 31, 2010
Wednesday, December 29, 2010
Crafting with Judy
Last week when I went over to Judy's we started out with lunch - a wonderful selection of little bites. Very festive and tasty.
We then went to the craft room to make some cute little boxes that Judy had found while browsing on splitcoaststampers.com. Each little box holds four of the Ghiradelli Chocolate Squares. I had been hoping to make a bunch of them before Christmas and use them as table favours but time got away from me and I didn't get them done.
Here are the two boxes I got done.

Supplies
Stamps - Tags Til Christmas
Ink - Cherry Cobbler
Card Stock - Pear Pizzazz; Very Vanilla; Jolly Holiday DSP
Other - Ornament Punch; Corner Rounder; Dimensionals; Sticky Strip; Basic Pearls
We ended up making one box each - so I would know how to do them at home.
We then moved on to the Faux Shadow Box Frame I showed you in THIS post. Judy punched out all the little bits for hers but our afternoon came to an end before we completed the project.
We then went to the craft room to make some cute little boxes that Judy had found while browsing on splitcoaststampers.com. Each little box holds four of the Ghiradelli Chocolate Squares. I had been hoping to make a bunch of them before Christmas and use them as table favours but time got away from me and I didn't get them done.
Here are the two boxes I got done.

Supplies
Stamps - Tags Til Christmas
Ink - Cherry Cobbler
Card Stock - Pear Pizzazz; Very Vanilla; Jolly Holiday DSP
Other - Ornament Punch; Corner Rounder; Dimensionals; Sticky Strip; Basic Pearls
We ended up making one box each - so I would know how to do them at home.
We then moved on to the Faux Shadow Box Frame I showed you in THIS post. Judy punched out all the little bits for hers but our afternoon came to an end before we completed the project.
Monday, December 27, 2010
Saturday, December 25, 2010

Thursday, December 23, 2010
Another Stampin' Up! Video - Fortune Teller Gift Basket
Here is another cute little project presented by Stampin' Up!
Tuesday, December 21, 2010
Quick Project - Stampin' Up! Video
I don't have anything of my own to share so thought you might like this quick little project.
Sunday, December 19, 2010
Decor Blocks
Last year I purchased a few sets of four 3" blocks from Stampin' Up! fully intending to decorate and display them. It didn't happen - for one reason or another the blocks and the Decor Elements vinyl I had bought never saw the light of day - until now! I needed a little gift for a chinese auction I will be participating in on Boxing Day.
I pulled out a set of blocks and the chocolate Holiday Mix Decor Elements (unfortunately this item is no longer available). I decided to use some of the papers from the Deck the Halls DSP pack.
I have seen others decorate some of the panels with photos - I decided to leave all but the front panels plain. I cut the bottom 3" from one of the sheets of DSP (I love the poinsettias) and used that for the front. The other sides are covered with a more subtle pattern from the package. I distressed all the edges and sponged them with Soft Suede ink. I applied the vinyl Decor Elements and they were done! I thought about spritzing them with a mixture of shimmer paint and rubbing alcohol but decided against it. I may change my mind, but for now I really like them the way they are. I have also decided to keep them for myself!

Supplies
Ink - Soft Suede
Card Stock - Deck the Halls Designer Series Paper
Other - Decor Blocks; Holiday Mix Decor Elements (retired)
I pulled out a set of blocks and the chocolate Holiday Mix Decor Elements (unfortunately this item is no longer available). I decided to use some of the papers from the Deck the Halls DSP pack.
I have seen others decorate some of the panels with photos - I decided to leave all but the front panels plain. I cut the bottom 3" from one of the sheets of DSP (I love the poinsettias) and used that for the front. The other sides are covered with a more subtle pattern from the package. I distressed all the edges and sponged them with Soft Suede ink. I applied the vinyl Decor Elements and they were done! I thought about spritzing them with a mixture of shimmer paint and rubbing alcohol but decided against it. I may change my mind, but for now I really like them the way they are. I have also decided to keep them for myself!

Supplies
Ink - Soft Suede
Card Stock - Deck the Halls Designer Series Paper
Other - Decor Blocks; Holiday Mix Decor Elements (retired)
Friday, December 17, 2010
"Skinny Bag" Treats
In addition to the snowflake tealight holders that have been featured on many craft blogs in recent months there have been a lot of posts displaying candies (mostly M&M's) packged in "skinny bags". I purchased some of the bags a while ago (http://www.clearbags.ca/) and then a couple of weeks ago I found the Christmas M&M's that I wanted so I was ready to start.
Although initially I found it a bit of a challenge getting the candies into the bags (they measure 1" wide by 8" tall) I finally got some made. So far I have only completely finished one of the bags, it shouldn`t take long to get the rest done.
I should have waited to take a photo of a bunch of them together, but here is my one lonely "Skinny Bag" treat.

Although initially I found it a bit of a challenge getting the candies into the bags (they measure 1" wide by 8" tall) I finally got some made. So far I have only completely finished one of the bags, it shouldn`t take long to get the rest done.
I should have waited to take a photo of a bunch of them together, but here is my one lonely "Skinny Bag" treat.

Wednesday, December 15, 2010
My Digital Studio Downloads
I don't have anything new to post - I have not been feeling well so have not been doing much crafting. I have been doing a bit of baking and trying to finish crocheting a baby blanket.
These are a few of the recent My Digital Studio downloads.

These are a few of the recent My Digital Studio downloads.
Monday, December 13, 2010
Penguin Pyramid
Ever since Stampin' Up! introduced the Two Step Owl punch there have been many posts demonstrating the very cute owl and other characters made with the punch - ghosts, reindeer and penguins! I have been experimenting making penguins and then one day I visited Connie Babbert's blog and saw THIS card. I loved it! My goodness who wouldn't.
I decided this would be on the list of cards to make with Judy. Today was the day! We made two changes - the first change we made was to the hat on the top penguin. Connie had stamped the hat image from Jolly Bingo Bits which I don't have. In any case we wouldn't have done that anyway - it involved cutting around a small image. I am sure I have said before that is something neither Judy nor I enjoy. I had seen somewhere that a hat could be made using the wing from the Two Step Bird punch so that is what we did. We trimmed it with a scrap cut with the Scallop Oval punch and the pom pom is from the Itty Bitty Shapes Punch pack.
The second change we made was to lightly stamp snowflakes on the Bashful Blue panel using Whisper White craft ink.

Stamps - Jolly Old Saint Nick; Serene Snowflakes
Ink - Bashful Blue; Basic Black; Whisper White craft
Card Stock - Real Red; Whisper White; Basic Black; Bashful Blue; Pumpkin Pie
Other - 1/8" Real Red Taffeta ribbon; Large Oval, Scallop Oval, Two Step Owl, Two Step Bird and Itty Bitty Shapes punches; Square Lattice embossing folder; wiggly eyes; Stampin' Dimensionals.
I decided this would be on the list of cards to make with Judy. Today was the day! We made two changes - the first change we made was to the hat on the top penguin. Connie had stamped the hat image from Jolly Bingo Bits which I don't have. In any case we wouldn't have done that anyway - it involved cutting around a small image. I am sure I have said before that is something neither Judy nor I enjoy. I had seen somewhere that a hat could be made using the wing from the Two Step Bird punch so that is what we did. We trimmed it with a scrap cut with the Scallop Oval punch and the pom pom is from the Itty Bitty Shapes Punch pack.
The second change we made was to lightly stamp snowflakes on the Bashful Blue panel using Whisper White craft ink.

Stamps - Jolly Old Saint Nick; Serene Snowflakes
Ink - Bashful Blue; Basic Black; Whisper White craft
Card Stock - Real Red; Whisper White; Basic Black; Bashful Blue; Pumpkin Pie
Other - 1/8" Real Red Taffeta ribbon; Large Oval, Scallop Oval, Two Step Owl, Two Step Bird and Itty Bitty Shapes punches; Square Lattice embossing folder; wiggly eyes; Stampin' Dimensionals.
Sunday, December 12, 2010
Another Patty Bennett CASE
I love Patty Bennett's work and thought THIS card would be a good one for Judy and I to make tomorrow. I don't often select non standard size cards but this one really appealed to me. The only change I made was to use two of the stamps from Delightful Decorations (Patty used an image from Tags til Christmas and one from Delightful Decorations) and I added a pearl embellishment.
The finished card is 3 x 6 so you can make four of the base cards from one 12 x 12 sheet of card stock

Supplies
Stamps - Delightful Decorations; Four the Holidays
Ink - Old Olive; Cherry Cobbler; Old Olive marker
Card Stock - Old Olive; Very Vanilla; Jolly Holiday DSP
Other - Basic Pearls; Stampin' Dimensionals; Ornament Punch
The finished card is 3 x 6 so you can make four of the base cards from one 12 x 12 sheet of card stock

Supplies
Stamps - Delightful Decorations; Four the Holidays
Ink - Old Olive; Cherry Cobbler; Old Olive marker
Card Stock - Old Olive; Very Vanilla; Jolly Holiday DSP
Other - Basic Pearls; Stampin' Dimensionals; Ornament Punch
Saturday, December 11, 2010
Dasher
As I said a couple of days ago, I had planned on making THIS card for my playdate with Judy last Monday but ran out of the Cherry Cobbler seam binding. I had already planned next weeks projects so I "lifted" one of them for this week.
I had signed up for Dawn Olchefske's 12 Weeks of Christmas and when I received the week 1 newsletter I instantly knew I had to make at least one - it uses Dasher and the Northern Flurry embossing folder along with Shimmer Paint! What more could you want! You can visit Dawn's blog HERE.
It doesn't show up well in the photo, but we spritzed the image panel with a mixture of Shimmer Paint and rubbing alchohol. We also left off the ribbon in the upper left corner - we actually prefer it without.

Supplies
Stamps - Dasher
Ink - Soft Suede
Card Stock - Soft Suede; Very Vanilla; Real Red
Other - Basic Rhinestones; Shimmer Paint and Rubbin Alcohol; 1/8" Real Red Taffeta Ribbon; Northern Flurry embossing folder
I had signed up for Dawn Olchefske's 12 Weeks of Christmas and when I received the week 1 newsletter I instantly knew I had to make at least one - it uses Dasher and the Northern Flurry embossing folder along with Shimmer Paint! What more could you want! You can visit Dawn's blog HERE.
It doesn't show up well in the photo, but we spritzed the image panel with a mixture of Shimmer Paint and rubbing alchohol. We also left off the ribbon in the upper left corner - we actually prefer it without.

Supplies
Stamps - Dasher
Ink - Soft Suede
Card Stock - Soft Suede; Very Vanilla; Real Red
Other - Basic Rhinestones; Shimmer Paint and Rubbin Alcohol; 1/8" Real Red Taffeta Ribbon; Northern Flurry embossing folder
Friday, December 10, 2010
Peaceful Season and Deck the Halls
This is the second of four cards I did with my sister and my nieces on Sunday. Sherida Giddings had given me one that she had made and knew it would be perfect for our get together. It was really fun to see them working with the Designer Series Paper. Although I used the same side of the paper as Sherida had on both of my cards, some of the others used the flip side and changed the orientation of the card to landscape. I liked the card so much I added it to the "roster" for Judy and I to make last Monday.
Here is the card. Unfortunately Sherida does not have a blog so I can't direct you to the original.

Supplies
Stamps - Peaceful Season (Level 2 Hostess Set)
Ink - Crumb Cake; Cherry Cobbler
Card Stock - Crumb Cake; Cherry Cobbler; Deck the Halls DSP
Other - Two Tags die for the Big Shot; Crop a dile; Jumbo Eyelets; Crumb Cake 3/8" Taffeta ribbon (retired); Linen Thread; Sponge Daubers
We actually did five projects - four cards (2 of each design) and some of the Santa Punch art notepads. Click HERE to see my previous post with the notepads. In addition to the card today and the one I posted a few days ago we made THIS card that I had done with Judy last week. The fourth card was the 3D Ornament card I had posted HERE that I had also planned on making with Judy this week - that has to go on the back burner for now - I lost track of how much of the Cherry Cobbler seam binding I had already used and I had just enough to complete our projects on Sunday.
We had a great afternoon. My sister and her girls made a great lunch; we did our crafts and had a lot of good laughs. We all agreed that we needed to do it more often.
We had a great afternoon. My sister and her girls made a great lunch; we did our crafts and had a lot of good laughs. We all agreed that we needed to do it more often.
Thursday, December 9, 2010
Faux Shadow Box
Anyone who follows Nancy Riley's blog (iStamp by Nancy Riley) will know that her creativity has had to take a back seat these past several months. Yesterday she was back with a fantastic shadow box project. You can see it HERE.
I knew I wanted to make one, but was housebound and couldn't get out to buy a frame. I wanted to do it right away so I searched around until I found a couple of artist canvases in my craft room. Happily I set to work adapting Nancy's creation to the supplies on hand. I decided to use the smaller canvas - about 8" x 10".
I used the same papers as Nancy but had to reduce the number of squares to accommodate the smaller size canvas I was using. Overall I am really pleased with my version and think it still maintains the "flavour" of the original.

Supplies
Card Stock - Basic Black; Blushing Bride; Naturals White; Garden Green, Real Red; Baja Breeze; Candy Cane Christmas Specialty DSP
Other - Candy Cane Buttons; Line Thread; Small Felt Flurries (retired); Brights Buttons; Two Step Bird Punch; 1/2" Circle Punch; Rhinestones; Rhinestone Brad - Circle Fire; Filigree Brad; Five Petal Punch; Boho Blossoms Punch; Stampin' Dimensionals; Real Red 1/4" Grosgrain Ribbon; Real Red Polka Dot Ribbon (retired); Stickles (nonSU); Sticky Strip; Linen Thread
I knew I wanted to make one, but was housebound and couldn't get out to buy a frame. I wanted to do it right away so I searched around until I found a couple of artist canvases in my craft room. Happily I set to work adapting Nancy's creation to the supplies on hand. I decided to use the smaller canvas - about 8" x 10".
I used the same papers as Nancy but had to reduce the number of squares to accommodate the smaller size canvas I was using. Overall I am really pleased with my version and think it still maintains the "flavour" of the original.

Supplies
Card Stock - Basic Black; Blushing Bride; Naturals White; Garden Green, Real Red; Baja Breeze; Candy Cane Christmas Specialty DSP
Other - Candy Cane Buttons; Line Thread; Small Felt Flurries (retired); Brights Buttons; Two Step Bird Punch; 1/2" Circle Punch; Rhinestones; Rhinestone Brad - Circle Fire; Filigree Brad; Five Petal Punch; Boho Blossoms Punch; Stampin' Dimensionals; Real Red 1/4" Grosgrain Ribbon; Real Red Polka Dot Ribbon (retired); Stickles (nonSU); Sticky Strip; Linen Thread
Wednesday, December 8, 2010
Season of Friendship
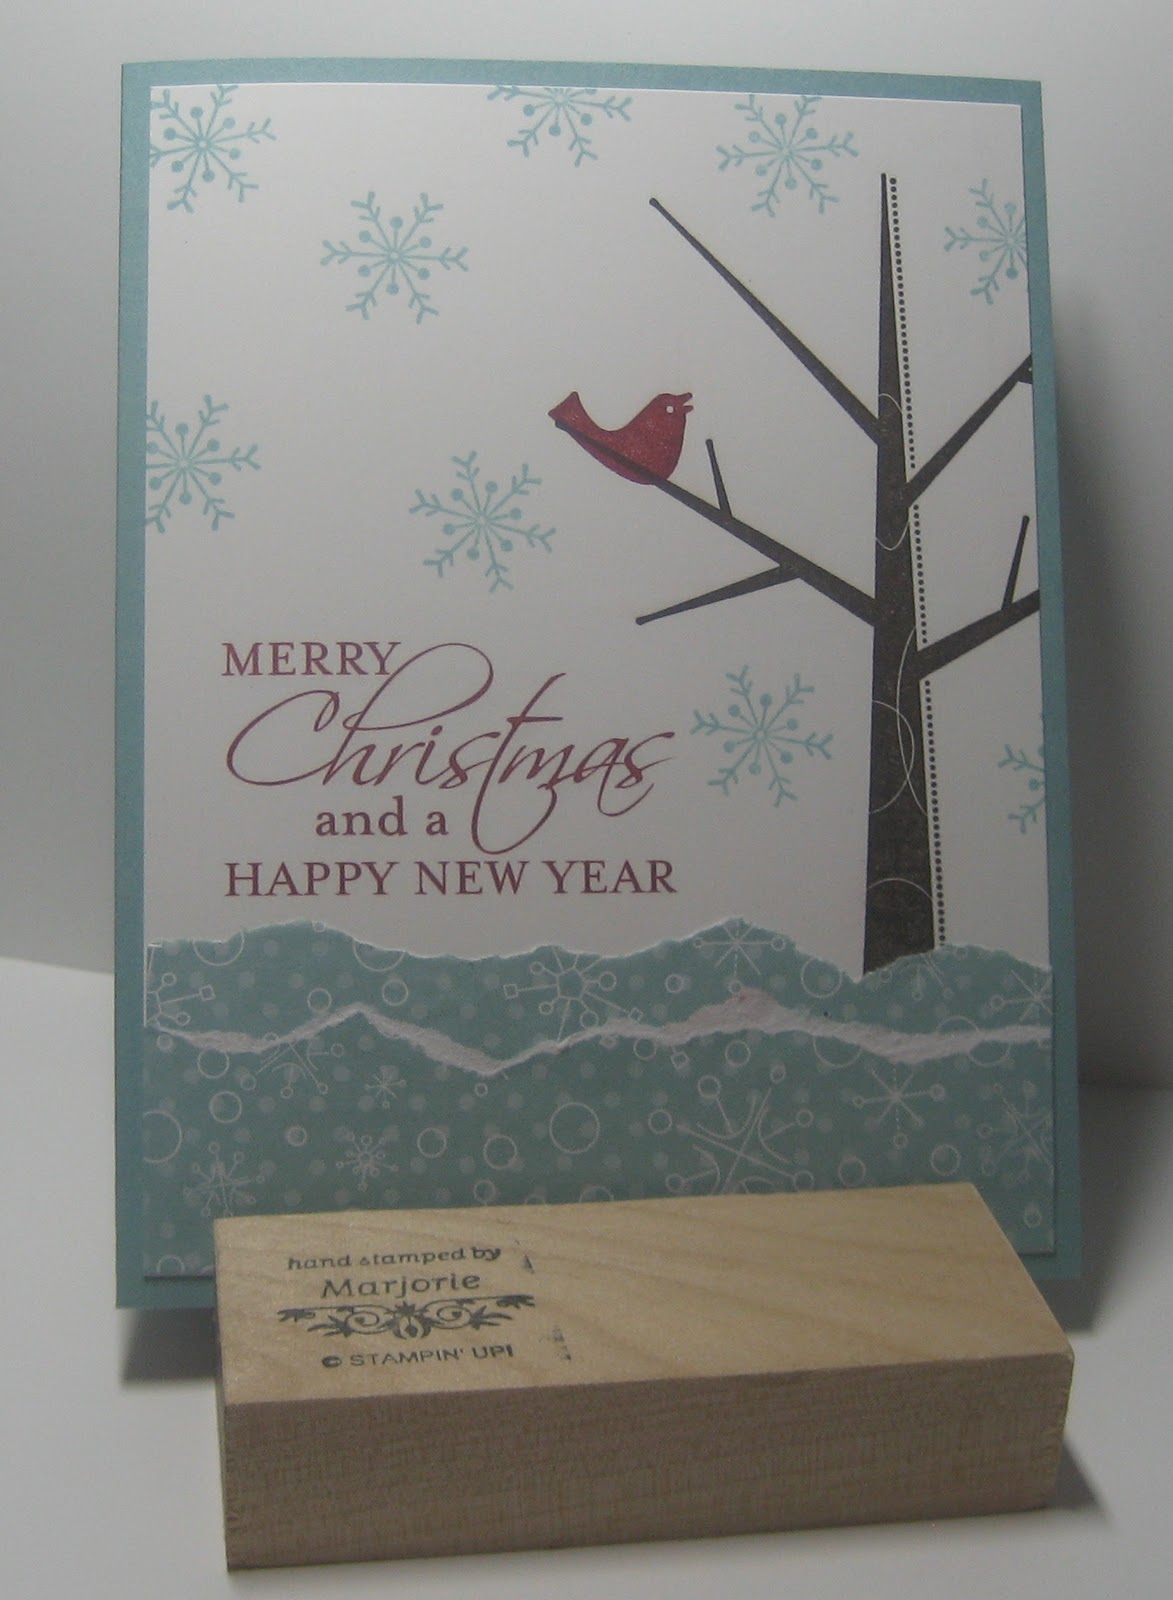
It has been quite a long time since I used the Season of Friendship stamp set so when I saw THIS card posted by Patty Bennett I kew it was time to dust it off. I don't have the Seasonal Sentiments stamp set that Patty used, however I do have My Digital Studio and had recently purchased the download for that set. It turned out great! Initially when I selected the stamp, it was very large so I just resized it to the approximate dimensions of the "real" stamp.
My sister and I had planned a stamping afternoon with her two daughters on Sunday so I added this fun card to the "program". The only change we made was to add some Stickles along the edges of the "snowbanks" and in the centres of the snowflakes. My photo does not show that - I took a picture of the wrong one. I didn't want to risk smudging the stickles when I packed up to go home.
So here is my version of Patty's card. We each made two of the card and I have to say that when we all finished there was a chorus of OOH's and AAH's!

Supplies
Stamp Set - Season of Friendship; Seasonal Sentiments (MDS)
Ink - Cherry Cobbler; Early Espresso; Baja Breeze
Card Stock - Whisper White; Baja Breeze; Candy Cane Christmas DSP
Other - Stickles (nonSU); My Digital Studio
My sister and I had planned a stamping afternoon with her two daughters on Sunday so I added this fun card to the "program". The only change we made was to add some Stickles along the edges of the "snowbanks" and in the centres of the snowflakes. My photo does not show that - I took a picture of the wrong one. I didn't want to risk smudging the stickles when I packed up to go home.
So here is my version of Patty's card. We each made two of the card and I have to say that when we all finished there was a chorus of OOH's and AAH's!
Supplies
Stamp Set - Season of Friendship; Seasonal Sentiments (MDS)
Ink - Cherry Cobbler; Early Espresso; Baja Breeze
Card Stock - Whisper White; Baja Breeze; Candy Cane Christmas DSP
Other - Stickles (nonSU); My Digital Studio
Tuesday, December 7, 2010
Roofing Materials in the Stamp Room?
Over the last several months I have seen a lot of crafters posting photos of tealight holders made using the Snowflake die for the Big Shot and roof flashing. Initially, although I thought they were very pretty, I wasn't going to make any - I was pretty sure I would end up cutting myself. I did get in touch with a couple of people and they assured me that the cut edges were not sharp so I headed out to one of the local building material stores and bought a roll of the flashing.
I made five sets for my parents - each tealight holder uses two of the snowflakes. My sister cut out enough to make 10 sets. I have a bunch cut out and just have to put them together. Although the photo shows this set using battery operated tealights, they are safe to use with "real" candles. They are just so pretty when lit!

I made five sets for my parents - each tealight holder uses two of the snowflakes. My sister cut out enough to make 10 sets. I have a bunch cut out and just have to put them together. Although the photo shows this set using battery operated tealights, they are safe to use with "real" candles. They are just so pretty when lit!

Monday, December 6, 2010
Jolly Holiday
I saw this card when I was browsing the internet a few days ago - unfortunately I didn't mark down the source. I will update my blog when I figure out where I saw it. I added a few dots with my white signo gel pen but otherwise it is a very close copy of the original.
This is the second card that I have prepared for Judy and I to make today. We ended up not getting to this card - we had a lot of catching up to do and only got to two of the planned cards.

Supplies
Stamps - A Cute Christmas; Short and Sweet
Ink - Cherry Cobbler; Cherry Cobbler, Pear Pizzazz and Old Olive Markers; Jet Black StazOn
Card Stock - Cherry Cobbler; Old Olive; Very Vanilla; Jolly Holiday DSP
Other - Old Olive 5/8" Satin Ribbon; Regals Button (Cherry Cobbler); Scallop Trim Border, 2 3/8" Scallop Circle and 1 3/4" circle punches; 1/2" corner rounder (non SU); dimensionals
Sunday, December 5, 2010
I "Built" a House
One of the benefits of being a Stampin' Up! demonstrator is the opportunity to pre-order items from upcoming catalogues and promotions. When the pre-order period for the Holiday Mini Catalogue opened on August 1 I ordered the Design-a-House. The house pieces are in the kit (along with that little brass door knob). The idea is to decorate and embellish as little or as much as you want. My house arrived, I put it on a shelf, took it out a couple of times and then finally a couple of days ago I decided I was going to do it! I have seen some that are much more elaborate and some that are a little simpler. Overall I am really pleased with my little house and am thinking of buying more before the catalogue sales period ends on January 3.
I used one of the patterns from the Deck the Halls DSP pack for the walls and added a few accents of soft suede. I knew I wanted a red door and roof. I put vellum behind the windows and although it doesn't show up in the photo the battery operated tealights inside give a really nice warm glow.
I added a few trees cut with a Sizzix die (non SU) and a cotton ball in the chimney. While looking through a cupboard I found the little Santa Claus and think he looks quite cute sliding down the roof!

Saturday, December 4, 2010
3D Ornament Card
This is one of the cards Judy and I will be making on Monday. I had seen it while browsing some of the posts on Stampin' Connection and knew that I wanted to make a few myself. You can link to the original HERE. The original had a layer of Crumb Cake card stock and one of the images had been stamped with Crumb Cake ink - I decided to stay with a red and white card.
I like the little bit of paper piercing in each of the corners and the three little pearls below the ornament. A fairly clean and simple card with a bit of a punch. You can't really tell in the photo, but the white card stock is the Stampin' Up! Shimmery White.

Supplies
Stamps - Tags til Christmas; All Holidays
Card Stock - Cherry Cobbler; Shimmery White
Ink - Cherry Cobbler
Other - Cherry Cobbler Seam Binding; Dimensionals; Basic Pearls; Gold Elastic Cord (retired); Ornament Punch; paper piercer; Mat Pack
Thursday, December 2, 2010
Another Frame
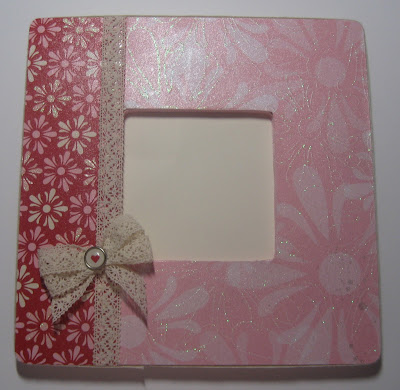
I really liked the frame I had made last month (HERE) and decided to make one using up some of the Sending Love Specialty papers from the 2010 Occasions Mini. I think it turned out really well - I ended up making two the same and I might make a third. They will make great gifts for parents of little girls.
Although the paper already has glitter accents, I also spritzed it with a solution of Frost White Shimmer paint and rubbing alcohol for some added shine. It is amazing how quickly these go together - a few pieces of paper, some ribbon, a brad and you are done.
Supplies
Paper - Sending Love Specialty Designer Series Paper (retired); Pink Pirouette (to cover the back)
Other - Crochet Lace trim; Sending Love Real Red Epoxy Brads (retired); Anywhere Glue Stick
Although the paper already has glitter accents, I also spritzed it with a solution of Frost White Shimmer paint and rubbing alcohol for some added shine. It is amazing how quickly these go together - a few pieces of paper, some ribbon, a brad and you are done.

Supplies
Paper - Sending Love Specialty Designer Series Paper (retired); Pink Pirouette (to cover the back)
Other - Crochet Lace trim; Sending Love Real Red Epoxy Brads (retired); Anywhere Glue Stick
Wednesday, December 1, 2010
Candy Cane Christmas
Last week Andrea Walford posted THIS card and although I do prefer more traditional colours for Christmas cards I really liked it. This was one of the cards Judy and I made on Monday afternoon when we got together.
We did change a few things - instead of using Basic Black ink for the greeting we used Pear Pizzaz. We also decided to have a bit more of the pink satin ribbon showing - you can hardly tell on Andrea's that there is any ribbon at all. We used some of the little felt flurries (available on the clearance rack) and retired pink epoxy brads.

Supplies
Stamps - Bells & Boughs
Ink - Pear Pizzazz
Card Stock - Gina K Luxury White 120 lb; Pear Pizzazz; Pretty in Pink; Whisper White; Candy Cane Christmas DSP
Other - Little Felt Flurries; Northern Frost Decorative Strip Die; Pink Epoxy Brads (retired); Square Lattice Embossing Folder; Scallop Oval Punch; Dimensionals; Pretty in Pink 5/8" satin ribbon
We did change a few things - instead of using Basic Black ink for the greeting we used Pear Pizzaz. We also decided to have a bit more of the pink satin ribbon showing - you can hardly tell on Andrea's that there is any ribbon at all. We used some of the little felt flurries (available on the clearance rack) and retired pink epoxy brads.

Supplies
Stamps - Bells & Boughs
Ink - Pear Pizzazz
Card Stock - Gina K Luxury White 120 lb; Pear Pizzazz; Pretty in Pink; Whisper White; Candy Cane Christmas DSP
Other - Little Felt Flurries; Northern Frost Decorative Strip Die; Pink Epoxy Brads (retired); Square Lattice Embossing Folder; Scallop Oval Punch; Dimensionals; Pretty in Pink 5/8" satin ribbon
Subscribe to:
Posts (Atom)