

Sunday, October 31, 2010
Saturday, October 30, 2010
Northern Flurries
This card features the Northern Flurry embossing folder as well as the Northern Frost Decorative Strip Die. Both are available in the Holiday Mini and I am hoping they will be carried over to the main catalogue.
I CASEd (copied) this card from Kim Assaly's blog HERE. Rather than using the linen thread to "hang" the snowflakes I adhered the to the card with dimensionals. Don't you just love the crochet lace trim and the pearls?

Two months from today and it will be Christmas Day. Where is the time going?
I CASEd (copied) this card from Kim Assaly's blog HERE. Rather than using the linen thread to "hang" the snowflakes I adhered the to the card with dimensionals. Don't you just love the crochet lace trim and the pearls?

Two months from today and it will be Christmas Day. Where is the time going?
Friday, October 29, 2010
Holiday Hoopla - Final Make and Take

The last of the six make and takes from the Holiday Hoopla event is a Christmas Banner. As with the previous projects, most of the supplies are from the Christmas Cheer Simply Scrappin' kit. This project uses the 1 1/4" Marina Mist striped ribbon and features a couple of the Big Designer buttons from the Candy Cane Christmas package.
The scallop squares and the letters were cut out using the big shot.
Thursday, October 28, 2010
Holiday Hoopla 3
Today I am sharing two more of the projects from the Holiday Hoopla event Judy and I attended last Saturday.
The first one is a packet of three 4 x 4 tags. The packet is made using the Top Note die. As with the chocolate bar holder I shared yesterday, the DSP was folded in half and placed on the die so that the folded edge was not on the cutting line. We tied the ribbon around and embellished it with elements from the Simply Scrappin' kit. I added one of the self stick rhinestones to the snowflake. The cards were cut, scored and then embellished with some of the DSP, card stock and die cuts from the kit.

The second project I am sharing today is a mini album. Although the inserts use materials from the Simply Scrappin' kit, the "album" itself is made from one of the Elegant Notes and envelope. The flap of the envelope was tucked inside and then the note card was adhered to the envelope. A piece of DSP was adhered to the note so that it would peek through the design. We decorated three squares of card stock and tucked them into the envelope. The little tabs extend so that they can be pulled out easily. This could be used as a mini photo album or by changing up the stamp set it could even be used for a small recipe booklet.

Wednesday, October 27, 2010
Holiday Hoopla 2
Yesterday when Judy and I got together we made two cards and two tags. They were all projects I had done with my sister in September and have been posted previously. We did the first of the two tags featured in THIS post as well as the card featured HERE.
Today's post features two of the make and takes Judy and I made at the Holiday Hoopla event we attended on October 23.
This first one is a chocolate bar holder made with the Top Note die for the Big Shot. We folded the DSP in half and ensuring that the fold was above the bottom cut line of the Top Note die we ran it through the big shot. The ribbon was tied around it creating a little pouch to hold the chocolate bar. The embellishment is from the Christmas Cheer Simply Scrappin' kit. Very quick, but very cute!

This project is a gift card holder. We created a sleeve using textured card stock. This was then stamped using the Contempo wheel and then punched using the Decorative Label punch from the Holiday Mini catalogue. The "To/From" label is a stamp from the Tags til Christmas stamp set and it coordinates perfectly with the punch.

This is the insert for the gift card holder. It has been decorated with the punched out piece from the sleeve and one of the die cuts from the Simply Scrappin' kit.

Tuesday, October 26, 2010
Holiday Hoopla
Last week I didn't post the card Judy and I made because I had posted it previously - it was one of the cards I had made with my sister. You can see that card HERE. We each made two of this card.
The projects I am featuring today (and for the rest of this week) are from a Holiday Hoopla stamping event that Judy and I attended this past Saturday. The event was hosted by Marlayne Hardy a local Stampin' Up! demonstrator. You can check out Marlayne's blog HERE. All of the projects were Christmas themed but could be easily adapted to any occasion. Marlayne had six make and takes prepped and ready for each participant and there were five "demo booths" set up around the room where other demonstrators showed various projects and gave quick instructions on how to complete them. In addition to Marlayne's presentation we were treated to a presentation from fellow demonstrator Cindy Major from Quebec City. Click HERE if you want to visit Cindy's blog. There were also several display boards around the room - all of the displays continued the Christmas theme. There were so many of them it was quite overwhelming!
The make and takes were all made with the Christmas Cheer Simply Scrappin' Kit along with some ribbon and buttons not included in the package. We each received half of a package with plenty of supplies to make our projects with lots left over. We made a box (measuring about 6" x 6"); a mini album; a gift card holder; a candy bar holder; a set of note cards with holder and a Christmas banner.
This is the box we made - it is amazing what a bit of paper, a few scored lines and sticky strip can do! Look at that luscious ribbon! It is the 1 1/4" striped ribbon in Marina Mist. The box is decorated with a few of the self-adhesive die cuts included in the Simply Scrappin' kit.

I had a gift that had to be wrapped and had been planning on using DSP. I changed my mind and made a custom box - I love that I was able to create a box specifically sized for the gift inside. I decided not to embellish this box as the DSP is pretty busy. The DSP is from the Love Letters package. The box bottom is Very Vanilla textured card stock and I used Very Vanilla 5/8" Satin ribbon.

Monday, October 25, 2010
Holiday Stamp Camp 4
I have now completed the fourth of the twelve projects from the Holiday Stamp Camp hosted by Sherida Giddings and Trina St. Michael. This one is a gift card holder.
This photo shows the gift card holder closed - there is a tab on the red panel that slides under a modern label punch secured to the card holder with brads.

This photo displays the gift card holder with the front flap opened. You can see the tab on the left created with a circle punch and the modern label punch is a little more visible in this photo.

The holder is fully opened in this photo. On the right you can see the pocket to insert a gift card and the middle section allows lots of space for a note.

This photo shows the gift card holder closed - there is a tab on the red panel that slides under a modern label punch secured to the card holder with brads.


Sunday, October 24, 2010
Rattle Me Bones
Today two of my sisters and some of their friends are participating in the Rattle Me Bones run to raise money for arthritis. There are also two children in their group (an eight year old girl and one year old boy). My sisters asked if I could make cards and medals for the children. I think this is probably the first time I have ever CASEd myself. You can click HERE to see the card I made for my grandniece a few weeks ago.
The Rattle Me Bones run has a Halloween theme so I decided to incorporate that into the cards and medals. As I did with my original card I sponged the background - Garden Green for the ground and mostly Bashful Blue for the sky. This time instead of using a scallop circle punch I used the scallop oval while sponging the sky. I found the banner on the Rattle Me Bones website - I just printed it to the size I wanted. Take a peek at the shoelaces - I used the SU fantastic 1/8" taffeta ribbon.
As before the medals were created in My Digital Studio. I found a downloadable font that was perfect for the Halloween theme. If you look closely you will see that the tops of the letters are a little pointy like bat's ears.


Saturday, October 23, 2010
Holiday Stamp Camp 3
This is the second set of three tags I made using the kit from the Holiday Stamp Camp. As with the tags posted yesterday this set features the Tags 'til Christmas stamp set.


Friday, October 22, 2010
Holiday Stamp Camp 2
There were 12 different projects included with the Holiday Stamp Camp. Two of the projects were sets of three tags. All stamped images in this first set of three are from the Tags 'til Christmas stamp set.


My posts featuring the projects from the Holiday Stamp Camp will be brief. As this was an event hosted by others and there was a fee I will not be sharing many of the details.
Thursday, October 21, 2010
Holiday Stamp Camp
In September I participated in a Holiday Stamp Camp hosted by two local SU demonstrators - Sherida Giddings and Trina St. Michael. I was not able to attend the event but signed on for a "Kit to Go. The instructions were emailed to me and I received all of the materials in the mail. I got distracted and have only just started making the projects.
The first one I decided to do is an "altoid tin". The kit included the silver tin and all of the embellishments. It uses some of the fabric featured in the current SU Holiday Mini Catalogue (for the flower on top and the decoration on the side of the tin). For both of those the fabric was already cut using the Big Shot and SU dies. The fabric for the side of the tin had been adhered to an adhesive sheet before cutting so it made it very easy to apply to the tin. Although a little bit tight a gift card will fit in the tin. I was thinking it would look great to use some silver cording to create a loop to hang the tin on a Christmas Tree. It is also the perfect size to hold several of the gift tags I will be featuring in the next couple of days.

Wednesday, October 20, 2010
Christmas Cards and Tags 5
The day I got together with my sister for our birthdays we made two tags in addition to the cards I have previously posted. Both of the tags are 3 x 3 cards and could be used as a gift enclosure or as a gift tag. We chose to use them as tags so punched a hole in one corner and threaded in some of the SU gold elastic cord (retired).
The first one is from Heather Summers' Contempo Christmas class.

Although not a CASE of any specific project, this second tag combines elements from different cards I have seen while browsing various blogs and other stamping resources.

The first one is from Heather Summers' Contempo Christmas class.

Although not a CASE of any specific project, this second tag combines elements from different cards I have seen while browsing various blogs and other stamping resources.

Tuesday, October 19, 2010
Christmas Cards and Tags 4
The final card I made with my sister is one from a class planner I purchased from Angela McKay - North Shore Stamper. You can link to her blog post HERE for more information.
This one features the Jolly Holiday Designer Series Paper and the Contempo Christmas stamp set.

This one features the Jolly Holiday Designer Series Paper and the Contempo Christmas stamp set.

Monday, October 18, 2010
Christmas Cards and Tags 3
The third card we made when my sister and I got together for our birthdays was also CASEd from Jen Picard. Click HERE to see Jen's cards.

Supplies
Stamps - Tree Trimmings, Christmas Greetings
Card Stock - Always Artichoke, Crumb Cake, Very Vanilla, Early Espresso, Deck the Halls DSP
Ink - Real Red, Old Olive, Early Espresso
Other - Very Vanilla Seam Binding, Two Tags Die, Basic Rhinestones, Scallop Border Punch, Dimensionals

Supplies
Stamps - Tree Trimmings, Christmas Greetings
Card Stock - Always Artichoke, Crumb Cake, Very Vanilla, Early Espresso, Deck the Halls DSP
Ink - Real Red, Old Olive, Early Espresso
Other - Very Vanilla Seam Binding, Two Tags Die, Basic Rhinestones, Scallop Border Punch, Dimensionals
Sunday, October 17, 2010
Christmas Cards and Tags 2
This is another one of the cards I made with my sister. I saw this one on Jen Picard's blog HERE.

Supplies
Stamp Set - Dasher, All Holidays, Snow Swirled
Card Stock - Cherry Cobbler, Crumb Cake, Very Vanilla, Deck the Halls DSP
Ink - Early Espresso, Cherry Cobbler
Other - Two Tags die, Scallop Trim Border punch, dimensionals, Clear Rhinestone brad, Chocolate Chip Wide Striped ribbon (retired), Linen Thread
Saturday, October 16, 2010
Christmas Cards and Tags
Can you believe how quickly the time has been ticking away! I am a little behind in getting my Christmas cards made, but at least I have a plan. I have my designs ready.
Last month I celebrated by birthday. One of my sisters celebrates hers a few days later and although there is always a family gathering, we try to get together at some point near our birthdays. This year we were a late making a plan, but we finally decided to do a card making afternoon. I would provide the materials and she would provide lunch and a little birthday cake. Worked for me. We made 4 cards and 2 tags each.
This is the first card we made. I first saw it on Glenda Mollet's blog HERE and knew that I would need to copy it. I love the Dasher stamp and the Deck the Halls DSP.

Supplies
Stamp Set - Dasher, Best yet (retired)
Card Stock - Crumb Cake, Cherry Cobbler, Early Espresso, Very Vanilla, Deck the Halls DSP
Ink - Early Espresso
Other - Scallop Trim Border Punch, Dimensionals
Friday, October 15, 2010
Final Day - Simply My Digital Studio 2
On the last day of the online class Heather's project was a 2 page collage of family photos for 2010. The entire two pages were filled with small photo boxes (64 on each page). I decided that I would fill my photo boxes with pictures of various cards, papercrafts and My Digital Studio projects I have made.


Thursday, October 14, 2010
Day 19 - Simply MDS2
I was so surprised how quickly the days were passing on Heather's online class. I had made a commitment to myself at the beginning of the class that I would complete each and every project on they day they were presented. I will say that I succeeded in that goal.
The layout for day 19 used bright fun colours. I did use pretty much the same colour palette and background layout as Heather but changed the photo layout to suit the pictures I had. While creating the page for Day 18 I found photos of my husband that were taken at Walt Disney World and decided to do a page dedicated to him. As we were planning that trip he kept insisting that he had to have his photo taken at the Dumbo ride and that he was going to ride the carousel. As you will see on the page he did all of that and we even got him to try on a Goofy hat and get his picture taken with it on.
The great thing about MDS is that you can quickly change the background colours, accents, text quickly and easily.

Wednesday, October 13, 2010
Simply My Digital Studio 2 - Bonus Layout
This was a really fun layout. I followed Heather's layout, but changed up the colours and embellishments.
In February 2006 when we were in Florida, two of my sisters came to spend some time with us and we spent some time at Walt Disney World's Magic Kingdom. We had a lot of fun n the rides and going through the attractions. I loved these pictures of my sisters on the carousel and couldn't resist creating a page using them.

In February 2006 when we were in Florida, two of my sisters came to spend some time with us and we spent some time at Walt Disney World's Magic Kingdom. We had a lot of fun n the rides and going through the attractions. I loved these pictures of my sisters on the carousel and couldn't resist creating a page using them.

Tuesday, October 12, 2010
Day 18 - Simply My Digital Studio Two
On this day we reviewed how to create a Blog Banner (Header) in MDS. Although I had already been doing so since I purchased the program last year, it was great to have Heather review some little tips and tricks.
I hard already created and saved a file recently, so rather than starting a new file I just opened the existing one and added to it. I ended up with a page containing three separate blog banners. Once I saved the file in MDS I saved it in a picture format (jpg) to my hard drive. I then opened it up in my photo editing software (3 separate times) and cropped the individual banners and saved them so that I can insert them into my blog when I want.
Here they are on the one page (8 1/2 x 11)

Here they are after they have been cropped and saved individually.


Monday, October 11, 2010
Simply MDS - Day 17
The technique demonstrated on Day 17 was how to use a grosgrain bow as a "tab". By carefully placing the bow and then strategically placing another object over it so that only a small portion is showing, the bow appears to be a little pull tab.
I decided to use a family photo as well as photos of my parents when they were first married and then from a few years ago.
You can see the little red tabs sticking out from behind the photos. If this was a `real` page, the little tabs could be pulled to reveal a journal entry hidden behind the photo.

Sunday, October 10, 2010
Day 16 - My Digital Studio
Heather's sample on Day 16 of her class feature her son Mark on the day he played his first football game and he scored a touchdown. She created a background to simulate a football field and then added her photos, embellishments and text. I remembered that I had a few pictures from when we went to a Spring Training game between the Toronto Blue Jays and the New York Yankees at Legends Field in Tampa, Florida. I did my best to recreate a baseball field and then built from there. I am really happy with my page. My nephew's face says it all - the Blue Jays did not have a very good game that day!

Saturday, October 9, 2010
Simply MDS 2 - Day 15 - Making a Movie
On Day 15 of her Simply My Digital Studio class Heather Summers demonstrated how to make a "movie" and add music and/or narration to our projects. It was so easy! I opened my project (I used my Simply MDS 2 project). On the menu there is a Music and Narration button. Selecting that brings up a page where you can then select music to add to the project. I chose one song and choose the "loop" option. This allows continuous play of the music while the pages are displayed one by one in a slidewhow. There is an option to add a personal narration - I didn't select that option for this project (you can elect to do a narration for each page!). Once that is completed there are just a few steps more to complete the "movie". There is also an option to burn the project to a DVD. How fun is that! You could put together your scrapbook, set it to music, create DVD's and send them as lovely little gifts to family and friends.
Friday, October 8, 2010
Simply My Digital Studio - Day 14
This page went together so quickly - a few photo boxes, embellishments, a bit of text and it was done. I created one text box - adjusted the size to what I wanted and then copied it multiple times. I placed the boxes where I wanted them on the page and then filled some of them with photos. I filled two of them with Designer Series Paper and the third with white cardstock. I then added a text box over that and wrote in my journal entry. I added a button and a ribbon knot on top of that. I use the small photo corner punch for the upper left and lower right corners - filled them in with Daffodil Delight. I used the Full Heart punch and increased the size - no problem with error messages if you increase the size before colour filling. I filled it with Cherry Cobbler and added a text box over it. A couple of buttons and a brad completed the top of the page. The bottom scallop is a stamp from All Scallops. I created it once using Cherry Cobbler and then copied it so go from left to right. I added some whisper white brads in each of the scallops and then added two rows of white stitching. Although there is a lot of white space, I resisted the temptation to fill the background with DSP or coloured card stock. Although I like the look of the one photo in black and white with the rest in colour, I prefer the look when all but one of the photos is black and white. The beauty of MDS is that you can alter it very quickly to ensure you have the exact look you want.

Thursday, October 7, 2010
Day 13 - My Digital Studio
I decided to do two version of the Day 13 layout. Who knows - maybe one day I will print the pages and insert them into a scrapbook or perhaps I will create multiple pages and have them printed as a book. Although there are quite a few elements on each of the pages, I am constantly amazed at how quickly the pages come together. I used the same colour palette on both pages so they could be a two page layout in a scrapbook.

.jpg)
Wednesday, October 6, 2010
Day 12 - Heather Summers' Simply MDS 2
Day 12 of the class demonstrated how to make your own background paper using stamp sets. Heather also showed how to effectively use alphabet stamps in a "random" pattern to create your title. Another technique on this page was to change all but one of the photos to black and white (a feature withing the MDS program - easy as a mouse click).
Hope you like it.

Hope you like it.

Tuesday, October 5, 2010
Simply MDS 2 - Day 11
Day 11 of the online class demonstrated how to get the look of "text wrapping" when creating a page. Heather's sample was a photo of her canyoneering during her recent visit to Utah for the Stampin' Up! Founders Circle event. She used a customized background paper - a cool feature in the program where you can select one of your own photos as the background. She then added her text box and positioned it and arranged the text so that it wrapped around the centre image of the photo.
I did two versions of that layout - one using a photo of a painting my cousin my cousin did as a tribute to our grandparents. It shows them "in the clouds" and below them are several of the landmarks near their home (including their house). The other is a photo of a pelican hovering above the water. My friend Debbie snapped the photo when we were together in Florida in 2009. I just love how his shadow is so clear in the water below.
.jpg)

Monday, October 4, 2010
CIBC Run for the Cure
Two of my sisters, my niece and her 4 year old daughter participated in the CIBC Run for the Cure here in Ottawa yesterday. I made a card for my grand-niece congratulating her for participating. Initially I was not sure what I was going to do and reached out to Heather Summers for ideas. Being the wonderful person she is, she did offer up some great suggestions. One of those was to use the little girl stamp from the Build-a-Bear collection. I don't have the stamp but it did get me to thinking - I have the Build-a-Bear die! I decided to use that.
I used the die to cut the bear figure in Creamy Caramel with a little Close to Cocoa accent on the face (both retired colours). I also placed a punched circle of black behind the head so it would show through for the eyes, nose and mouth. I used the Beary Essentials die to cut out her clothes (the jacket and pants are Pretty in Pink; the shirt is Pretty in Pink DSP and her little shoes are Whisper White). The bow on her head was cut using the Beary Girl sizzlit - I decorated it with a small rhinestone jewel. The button on her jacket is a 3/4" circle. I made the ribbon of hope by die cutting the '&' from a nonSU numbers die and then trimming the ends to look like a ribbon. I used a tiny rhinestone in the centre.
The background is sponged with Garden Green, Bashful Blue and Not Quite Navy. I used the scallop circle punch as a mask so that there would be clouds in the sky. I adhered the bear using dimensionals.
I stamped and trimmed the banner before sponging the edges with Pretty in Pink ink. Before adhering it to the card I curled it a bit and then attached it with dimensionals.
I also made a little 'medal' for her. I created the image panel in My Digital Studio, printed it, cut it out with the clear circle die and then attached it to the Pretty in Pink scallop circle. I decorated it with a few of the rhinestone jewels and added the ribbon. The other side of the medal is identical.

Day 10 - Simply My Digital Studio Two
On day 10 of the class Heather didn't give us a completed page to view - she did a sketch of a 12 x 12 layout and challenged the participants to create and post their own creation. I was intrigued with the layout but initially wasn't sure where to start or what to do. I like to see a completed sample and take inspiration from that.
I decided that I wanted to use some photos of my oldest son. As I was selecting the photos to use I came across a photo of a sunset at the beach in St. Petersburg, Florida that he had taken several years ago when we were there for Christmas. I decided to use that as the focal image and then surround it with the photos of him. In Heather's sketch there was a circular photo box within the large circle - I decided not to use that. Rather than filling the background with a solid colour or DSP, I chose a distressed pattern that I think works well filling in the white space without taking away from the page elements.

It is really amazing how quickly a page comes together in MDS. You can quickly change any of the elements - background papers, photos, stamps. I love it and I don't consider myself to be a scrapbooker at all.
Sunday, October 3, 2010
Simply My Digital Studio - Day 9
The ninth day of the class (September 18) demonstrated how MDS can be used as a tool to design projects that can later be recreated using paper, stamps and ink or can be printed on cardstock and then cut out and embellished.
I decided to use mine as a design tool and I will be recreating these Christmas Tags using Stampin' Up! products.

I decided to use mine as a design tool and I will be recreating these Christmas Tags using Stampin' Up! products.

Saturday, October 2, 2010
Day 8 - Simply My Digital Studio Two
Day 8 saw us making a "collage" page. We created a page that was partially filled with 2" photo boxes. Added the photos, a bit of background paper, embellishments and a few stamps and were done.
I decided to "scrap" some of the photos from a trip my sister took a few years ago. She hasn't yet done her scrapbook so maybe seeing this will get her going on that.

I decided to "scrap" some of the photos from a trip my sister took a few years ago. She hasn't yet done her scrapbook so maybe seeing this will get her going on that.

Friday, October 1, 2010
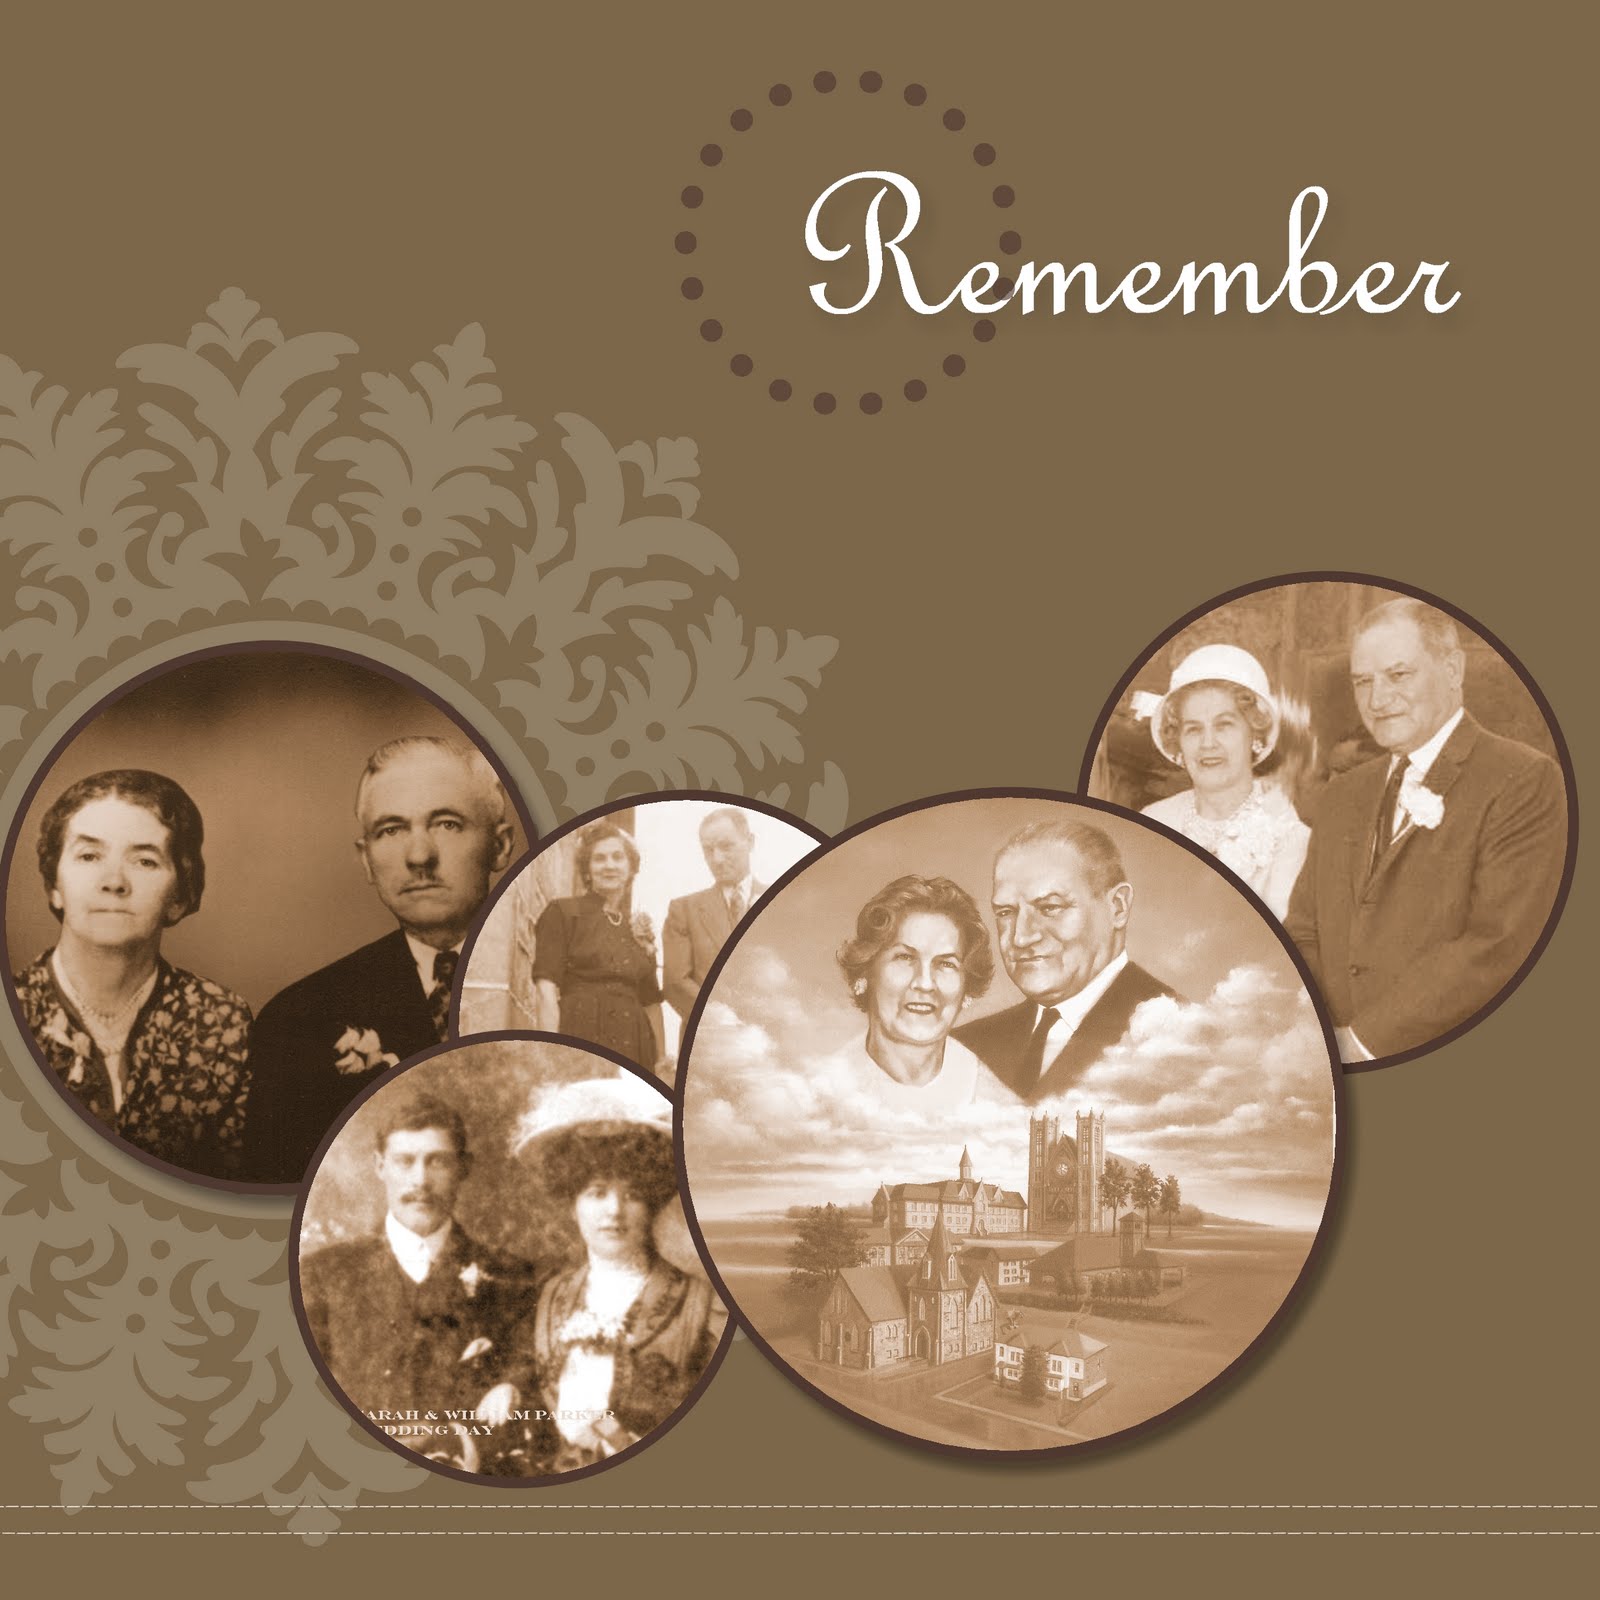
Simply MDS - Day 7
Day 7 of the class demonstrated how you can very quickly put together a page (or even a multi-page project) by selecting one of the templates included with My Digital Studio and bringing in your own photos. For my page I selected a template that only had one page. Although the template only included one round photo box with several circles filled with DSP I decided to change it up to have all round photo boxes. I also moved the "Remember" from the bottom left had corner to the upper right corner and added the dotted circle stamp. In addition, I chose the option to change the photos to a sepia effect.

Subscribe to:
Posts (Atom)